
I played another game of 'O'' Group at Croydon today against Michael S. Today's game was my new Soviet Infantry against a German panzergrenadier battalion. I played the Russians and Michael took command of Fritz. He wanted to see if the panzergrenadier battalion was worth the extra 5 points.
The table represented a Soviet State Farm on the left, two sections of
Built Up Areas (BUA's) at the center intersection, high ground at the upper right corner held by the Germans with a forest opposite. The right edge of the table is north so I was attacking along the bottom table edge from the east. The Germans had 4 entrenchments that they could place within their deployment area (
the wheat fields adjacent the road, the bombed out BUA and the remaining line of the road). The wheat fields are tall and ready for harvest so they provide cover.
The Soviet preliminary bombardment was highly successful (three 1's) resulting in the loss of 1 full platoon, plus a section and one HQ order. Interdiction lasted for 2 turns.
The forces of the Soviet Motherland gained the initiative and their combat patrols and BA10 armoured cars moved forward to seek out the Hitlerite forces.
"There they are Sergi, hiding in wheat fields!"The Germans quickly deployed and tried to shoot down the Soviet patrols but came under fire themselves from the armoured cars.
Near the farm a platoon of brave
Heroes of The Soviet Union deployed ready to storm the compound and liberate it. Sneaking out of the wheat a German platoon emerged and laid down a withering fire, suppressing the brave heroes.
Outside the central BUA another platoon of
Heroes deployed and were hit by more intense fire from the panzergrenadiers at close range. The Soviet FOO called down a mortar barrage which did little other than cause some shock.
Tit for tat, the German called in his own mortars and supressed the Soviet platoon. Under intense small arms fire and mortar shelling, these
Heroes of The Soviet Union stood their ground and managed to rally off one point of
Shock.
The mortars seemed to do little so the Russian FOO called in Divisional Artillery and the big guns responded. The barrage hit two Hitlerite platoons and drove them both back with casualties. To the south a platoon of T34's moved up to help the infantry who were being shot up and suppressed. The drove the Fritz's into the farm complex to seek cover.
With the armoured cars in support but unable to rally quickly enough to take advantage of the German retreat from the first BUA, the leading platoon was once again hit by Hitlerite mortars. With great fortitude these
Heroes of the Soviet Union stood their ground (
they became supressed but with no casualties).
Amidst the rubble of the bombed house a panzerschreck made ready to do some dirty business.
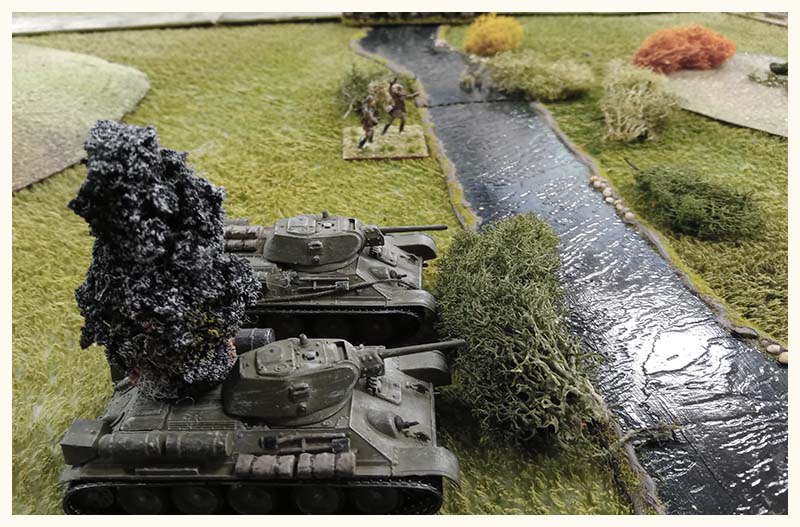
The lead BA10 was their target and the paper thin armour was less than useless as the rocket blew the outdated vehicle to kingdom come.
With the threat of the T34's the Germans brought on their own armour in the shape of a StuG IV platoon. They immediately opened fire on the Soviet tanks and promptly missed their targets.
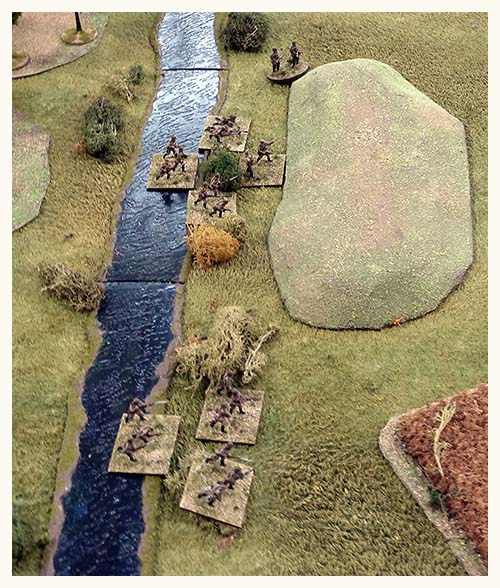
Around the farm the action intensified and the picture below does not look as it seems. The soviet platoon (bottom right) moved up to engage a German platoon in amongst the hay bales. But they were surprised by a platoon of grenadiers in
Ambush at the corner of the adjacent field hiding in the wheat. They took withering close range fire and were immediately supressed. The only thing that saved the platoon from further damage was an accurate artillery barrage that drove back both of the German platoons.
The Game was getting more intense and I forgot to take photos:
At the farm itself, the former
Heroes of the Soviet Union who were initially ordered to take the objective were shot up and failed a
Rout Test which saw them run for their lives (and straight into the caring arms of the NKVD!). A T26 Flamethrower tank moved up and with a fresh platoon assaulted the farm and annihilated the Hitlerites cowering within.
At the center road the attack was bogged down. The platoon attacking the BUA had retreated following a failed
Rally Roll. The situation was looking grim. However, the the Soviet Commander saw a chance:
At the edge of the forest a platoon had been deployed to hold firm for several turns. The only thing they had done was to shoot up an enemy combat patrol. Another Soviet combat patrol had also moved to the right. In the
Regroup Phase the troops in the forest broke out and advanced quickly taking the northern end of the road (
11" move!) whilst the 3rd platoon of the company deployed onto the combat patrol.
Casualties had been mounting for both sides and by now both had one FUBAR. I also rolled a Hesitant Company result when rolling my Command Dice. Instead of taking the Hesitant result I pulled one of the Soviet Special Rules. This took the form of "getting rid" of my problematic company commander and replacing him. This cost 2 HQ Orders and allowed me to re-roll my Command Dice. It pays to have a few commissars to keep the officers on their toes.
I played a sneaky trick and advanced by second BA10 section and attracted the attention of the panzerschreck. This was just to divert attention and make the Germans waste an
Order because the armoured car was next to useless and it's loss did not affect my command rating.
The Germans prepare to counter attack. See that patrol marker at the top of the pic below? I had a pretty good suspicion as to who they were and what they were going to do. The platoon in the pic below were the troops who sprung the ambush and were thrown back by the artillery.
Before I could take the farm by storm that suspect combat patrol became a second panzerschreck section (just as I expected) and their target was the little flame-tank. They crept through the long wheat and hit the little tank and it's next to useless armour didn't stand a chance against the 88mm rocket (
-5 to my armour save!).
On a roll the anti-tank team moved up again and managed to damage a T34. A follow up shot by one of the StuG's then destroyed the section. During previous turns a long firefight with the Soviet and German armour had taken place. The StuG's couldn't hit a thing (I think it was 9 Rolls for zero hits). After a few turns one StuG section was destroyed and the remaining one eventually got a round on target.
In the center the first platoon managed to rally and came back to the fight whilst the rest of the company surged up on the flank of the central BUA's.
The Russians finally took the farm which was their first objective and immediately
Consolidated and brought on their third company. The Germans once again advanced into the wheat back to their ambush position and blasted the platoon that was still in position at the fence line. That platoon took casualties and withdrew back into cover.
The German commander tried to counter attack by bringing his reserves from the table edge. They fired into the Soviet flank to little effect. The Hitlerites were by this time on 2 FUBAR's and their command structure was struggling.
The final drive began with an assault into the BUA. The panzergrenadiers holding out were battered and suppressed and the fresh platoon overran them easily.
Hoorah! The Heroes of the Soviet Union!Not seen in any of these photo's is a second platoon of T34's that crested a small rise and blasted the Germans in the field with HE. Along with small arms fire from one of the fresh platoons of the 3rd Company, the Fritz platoon was suppressed, took casualties and was then assaulted from the farm where it was wiped out.
The German counter attack was completely smashed by the final Soviet artillery barrage and amounted to nothing as the platoons were driven back bloody and supressed. The Hitlerites were now only two losses away from their 3rd FUBAR and eventual defeat and I tried everything to bring it about, even to the point where I exhausted every single order I had. I just couldn't break them.
By now the Germans had lost their steam and their command was failing. Nothing was going their way and in the next Soviet initiative the infantry assaulted both of the panzerschreck sections that had been left out on their own. The loss of these troops was enough to break the German command.
More
Heroes of The Soviet Union, sweep through the wheat fields wiping out pockets of resistance.
Hoorah!+++++++++++++++++++++++++++++++++++++++++++++++
Conclusion:
It was a difficult win but in the end it was playing dirty that won the game for the Russians. The flame tank was nasty but it wasn't a guaranteed thing. I had to roll to see if I could get it and there was a 50/50 chance that I couldn't. Lucky for me that I rolled well and I did get it because I think it saved the day. But... the Eastern Front wasn't a pretty war and fighting dirty was the normal order of things.
I didn't expect the Russians to do as well as they did. The infantry isn't good at fire and movement and they suffered a lot for that and I commented that they were pretty crappy. But in the end it was the infantry in combination with the artillery that won the game. So, who knows?
Michael still wasn't convinced that the Panzergrenadiers are worth the points cost. They did a lot a close range shooting and easily managed to supress my troops. The majority of my casualties were caused by small arms fire including the destruction of a full platoon.
I used a Regular rated battalion. The main reason for this is because I have limited Soviet models etc, and I couldn't fill the extra two points I would have gained by having a Second Rate battalion. A Second Rate force doesn't have the ability to call in artillery as effectively as a First Rate Battalion.
My artillery was very effective however, I rolled a bunch of 6's on my first Command Roll taking me beyond the minimum 5 HQ Dice required by a 2nd Rate battalion before it is able to call in artillery. It didn't really matter but for those readers who know the rules and are wondering why my artillery was so effective... This is the reason.
Having said all of that, Michael's artillery was non-existent. He never managed to call in one single artillery barrage. All he managed were a few mortar strikes before rolling a Low Ammo result.
It was a good tough game and the Russians went beyond my expectations. Michael made more tactical mistakes than I did this time around and the dice were not on his side this day. Especially where his StuG's were concerned! The Russian ability to field cheap T34's (4 of them for 11 points) came in pretty handy and would have to be a "must have" for any game set in 1942 or beyond.

 The Germans were deployed around the village of Smirnoff guarding a vital intersection. There was a pine forest to the German rear where their battalion headquarters and reserves were deployed . My forward deployment line was from the small hill in the foreground of the picture below, through the forward Built Up Area (BUA) & fields and on to the wooded hill in the background.


 The Germans were hurled back with heavy casualties (2 KIA sections). A follow up second assault caught the surviving Germans flat footed and wiped them out (they withdrew but only managed to run 2" on 2d6). The loss of this platoon caused a second FUBAR on the German battalion command and the Soviets now had an empty flank facing them.
 German mortars pounded the forward BUA time and time again with little to no result. With the only infantry to oppose them, the T34's in the center could have advanced but chose to sit still and pound the central German strong point with HE.
 And soon Ivan's mortars joined in. The platoon help up well but the combination of mortars and HE suppressed the defenders and soon KIA'd one of the sections.
  With one flank gone and my position now outflanked, it was only a matter of slowly grinding the Germans down. We were out of time but I was also on my way to a 3rd FUBAR. So I would call this a Soviet victory though, not a decisive one.


