Once again there was action on the Russian Front this weekend in Melbourne. We suffering folk in Victoria were were again locked down for the 4th time several weeks back. Our Five Day lockdown lasted for 30 odd days which put the kibosh on our bourgeoning O Group shenanigans. But the club was opened again this week and once again the Red Army attempted to throw the Wehrmacht back from the Motherland!
This time around Michael played the Soviets and I the Germans. We tried a similar game on a Friday evening the week prior but it was a bit of an aborted effort due to a late start and time limitations.
Somewhere on the Russian front 1943:
The Germans were deployed around the village of Smirnoff guarding a vital intersection. There was a pine forest to the German rear where their battalion headquarters and reserves were deployed . My forward deployment line was from the small hill in the foreground of the picture below, through the forward Built Up Area (BUA) & fields and on to the wooded hill in the background.
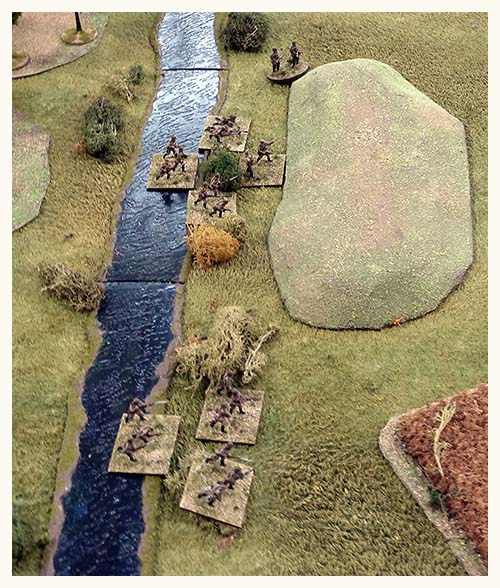
The Russian start line was just behind the banks of the stream. The stream was considered Rough Ground. Vehicles crossing, except by the culvert would become bogged if any double was rolled whilst attempting to cross.
Apparently Dr Who was in the vicinity to observe the proceedings and, no doubt, cause trouble where he was least wanted! (One of our club members, James, has several TARDIS's in different scales which often appear on various tables at random times.
The Second Company commander waits for the first sign of the Soviet advance.
The Russian attack got underway as they swiftly advanced over the river with German Sniper fire causing some consternation and making some solders seek the cover of the ground (Snipers caused 2pts of Shock on one unit).
With the infantry came a troop of Lend Lease Stuart tanks in a reconnaissance role. Although light, these proved to be more durable than the BA10 armoured cars used previously by the Soviets.
However, as swift as the Soviet advance may have been, the Wehrmacht response was also swift as the Red infantry became the target of the German gunners. The artillery proved to be quite ineffective even though the first dice roll was promising with a roll of double 6's! Meaning :
A re-roll for Divisional Artillery! (which then transpired into an ineffective medium battery stonk).
But no sooner had the dust settled from the German guns than Soviet mortars crashed in on a German platoon that had taken positions in the foremost BUA. The Krauts weathered the storm with some
Shock but their
Combat Patrol was sent packing.
I was intending to deploy a panzerschreck on that Combat Patrol to deal with the Stuart's heading up the road but that wouldn't be happening now. Instead the platoon in the houses tried to target them with their panzerfaust but they were out of range.
German mortars struck again, this time targeting the tanks but had very little effect. The Soviets retaliated again with their own mortars in a tit-for-tat fight but they also brought forward a 47mm infantry gun (
we subbed a 47mm AT gun) and the HE of the Stuarts to bare on the BUA. The German platoon didn't fare well and became
Suppressed.
The Russians soon came under fire from a German strongpoint set up in a bombed out, but still sturdy administration building. The most solid structure on the table. A platoon with attached MMG opened up on the infantry in the wheat field causing minor shock.
Soviet mortars, infantry gun and the tanks struck again and this time the platoon in the BUA lost two sections. The third section held their ground but before the mortar smoke had even cleared Soviet infantry charged in and wiped out the platoon before the survivors could make their escape (they failed their
Withdrawal dice roll).
As the fight at the farm raged I revealed one of my ambush units: A quad 20mm AA gun. It opened up on the Russian infantry in the wheat field with little to no effect. It then targeted the Stuart platoon and peppered one section full of holes destroying it. That was far more effective!
The infantry gun was giving me grief so another of my a
mbush units was deployed - A StuG IV. It advanced out of its hidden position in the pine forest and laid down some HE.
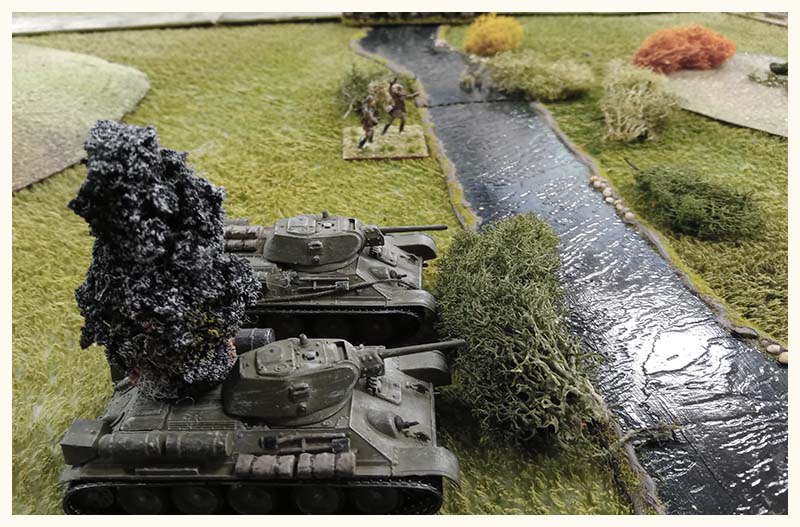
The sight of the German tank prompted a Soviet retaliation with the deployment of a platoon of T34/76 tanks. They advanced up to the river bank and a long range armoured duel began. The T34's had some initial success gaining a hit on the StuG and causing some shock.
However, the superior gun and the excellent training of my
panzertruppen paid off and half of the Soviet tank platoon was soon blazing away.
But this tank on tank battle wasn't slowing the Soviet infantry. They had taken their first objective and now consolidated to bring on the HQ of their 3rd Company.
Securing the Second Coy flank was a, infantry platoon with the quad AA gun on a wooded hill. These troops now attracted the Soviet mortar fire which, at first was not very effective.
The Stuart tanks had stalled with the quad AA gun damaging the second section but not destroying it, so the little US tanks were still a threat in the center. The Ivan infantry in the wheat field took a pounding. They were under fire from the MMG in the strong point straight ahead of them & the quad AA on their flank. But nothing would dislodge them. I was convinced that the wheat was planted over the top of previously dug trenches and the Russians were hiding in them. They were eventually suppressed after much shooting and only a failed
Rally Order saw them fall back, although still in good order.
A second mortar stonk on the Second Coy forward position in the wood was more effective in destroying the quad AA and supressing the infantry platoon.
I also had a panzerschreck anti-tank section on the table that had also been firing (and missing) on the Stuart's but I pulled them back in favor of the quad AA. Now, that the gun out of the commission it was time to get these brave fellows back into action.
A Soviet infantry platoon now made a bold move by rushing forward to try and out flank the next position held by the Germans. But they came on unsupported and the rapid deployment of my reserve company up to the roadside caught them unawares. By using a
Company Command Order, I was able to open fire and drive the platoon back with the help of HE from the near by StuG.
And speaking of StuG's, I deployed my final
Ambush Unit, which was another StuG, when a second platoon of T34's appeared on the road. Like the other one, this StuG was hiding in the bushes and moved forward to target the Soviet tanks. Another long range tank duel ensued over several turns and the StuG managed to cause some damage and shock. Unfortunately the Soviets got the better of this firefight and the German tank took too much damage forcing the crews to bail out and flee.
On the other side the first StuG kept up a good rate of fire and totally stalled the Soviet armour on that flank. Also, beyond the tank, one of my reserve infantry platoons charged across an open field and took on the remaining troops of the advanced platoon of Ivan's and drove them off.
Casualties: In previous games we just put aside our dead 'uns and counted them. Michael said it would be a good idea to make a first aid post. I said I had one! So this time around I set it up and used it as an area to place my KIA units. (
This is photo is from earlier in the game and by this stage, even if the commentary sounds one sided, I was on my way to my 2nd FUBAR!)
The Soviets, on the other hand didn't have the luxury of decent medical facilities, so instead Michael used my little pig sty model to house his wounded, in true, compassionate, Soviet style!
The panzerschreck team advanced again and got within range but, once again, the missed their target before pulling back to relative safety.
In the advanced Second Coy position, a Soviet infantry platoon advanced rapidly with the support of a second infantry gun. After their initial advance the platoon stalled at the foot of the rise when their company became
Hesitant. My infantry in the woods above them managed to rally and caused them some trouble with some desultory shooting but didn't manage to KIA any of sections.
The Soviets then got their act together and rallied. With supporting HE fire from the infantry gun, which again supressed the Krauts the soviet commander used a
Company Command Order and charged in with a close quarters assault.
The Germans were hurled back with heavy casualties (2 KIA sections). A follow up second assault caught the surviving Germans flat footed and wiped them out (they withdrew but only managed to run 2" on 2d6). The loss of this platoon caused a second FUBAR on the German battalion command and the Soviets now had an empty flank facing them.
German mortars pounded the forward BUA time and time again with little to no result. With the only infantry to oppose them, the T34's in the center could have advanced but chose to sit still and pound the central German strong point with HE.
And soon Ivan's mortars joined in. The platoon help up well but the combination of mortars and HE suppressed the defenders and soon KIA'd one of the sections.
With one flank gone and my position now outflanked, it was only a matter of slowly grinding the Germans down. We were out of time but I was also on my way to a 3rd FUBAR. So I would call this a Soviet victory though, not a decisive one.
++++++++++++++++++++++++++++++++++++++++++++++
This game was a bit different. We played on a slightly larger area (6'x5') which opened things up considerably. There wasn't a lot of cover for the advancing Russians but Michael made the best of it. Long ranges on the 6' long-axis also kept some targets in the open out of range. It was definitely a slow grinding attack which wore down my troops. I had a couple of Hesitant company rolls which were not really taken advantage of. But I was also unable to take maximum advantage of a couple of Soviet Hesitant Company results.
That loss of dice from a FUBAR really makes a difference. In the second to last turn I ended up with a Hesitant Company and only 3 Orders (I rolled four 1's out of seven dice). Not a lot I could do and not many troops to do anything with. All up I think we played 16 turns which was pretty good going. Maybe a turn limit could help speed things up a bit as well as some more scenario based victory conditions other than: "3 FUBARS."
One aspect that did work very well in my favour was using a Reserve Deployment Order to bring on my reserve company quickly. With this order I brought on two infantry platoons and they moved in fast 12" for one and 14" for the other. This enabled them to counter the bold move of that Russian platoon that move up quickly in the center.
All in all: Another great game. I really like these rules and the broad sweep of a decent sized battle that they depict.

 The Germans were deployed around the village of Smirnoff guarding a vital intersection. There was a pine forest to the German rear where their battalion headquarters and reserves were deployed . My forward deployment line was from the small hill in the foreground of the picture below, through the forward Built Up Area (BUA) & fields and on to the wooded hill in the background.


 The Germans were hurled back with heavy casualties (2 KIA sections). A follow up second assault caught the surviving Germans flat footed and wiped them out (they withdrew but only managed to run 2" on 2d6). The loss of this platoon caused a second FUBAR on the German battalion command and the Soviets now had an empty flank facing them.
 German mortars pounded the forward BUA time and time again with little to no result. With the only infantry to oppose them, the T34's in the center could have advanced but chose to sit still and pound the central German strong point with HE.
 And soon Ivan's mortars joined in. The platoon help up well but the combination of mortars and HE suppressed the defenders and soon KIA'd one of the sections.
  With one flank gone and my position now outflanked, it was only a matter of slowly grinding the Germans down. We were out of time but I was also on my way to a 3rd FUBAR. So I would call this a Soviet victory though, not a decisive one.


Thanks for posting, I appreciate the work that has gone into that. My rules arrived last week and I am just exploring the armour rules, which I like very much.
ReplyDeleteThanks Norm. Give them a go. I think they're a great set of rules. I like that the infantry carry the game. Too many WWII games can make infantry redundant with the death of "that one single figure" who holds the entire section together and without whom they become useless. That doesn't happen with O Group.
DeleteExciting game. I love 20mm WW2 stuff as well. I've invested way too much since the 1970's on 1/72nd scale to go to 15mm or 28mm. Your game shows why it's so good. Detail and space for gear. It's a great mix of the two...my eyes aren't what they were and it's just right for me... especially when you still see great games like this still around. Thanks a lot for posting it.
ReplyDeleteThanks SRD. I started in the 70's too with Airfix and Matchbox kits. For me WWII will always be in 20mm because that's how it's always been and it's also the scale I like.
DeleteGreat AAR, one question did you make the explosion markers?
ReplyDeleteThanks Latch.
DeleteFunny you should ask I was discussing this very topic just last week with a friend. They are made with copper wire glued to a washer. I then pushed lumps of clump foliage onto the wires and glued them in place. They took a lot of black pray paint to cover them properly but then I just dry brushed them grey and then white. I added the firey paint somewhere along the line too.