Wednesday, March 31, 2021

'O' Group - Solo - First Try

The troops are ready and it was time to try the new 'O' Group rules by David C Brown via the Too Fat Lardies stable. Being totally unimaginative, I decided to try the attack on the town of Cristot scenario in the rule book where everything is set out and I have all the models and figures required. So I set up a rough approximation of the map and got down to it. My table is a 6' x 4' and it may be a little small for 20mm but it works well enough for me.

Looking at the table, the British will be coming on from the right and their first objective is the farm near the center of the image. The town of Cristot is center left. The British consist of a battalion of the 6th Green Howards with support from the 7th Dragoon Guards (two tank platoons). The German defenders are elements of the 12th SS Hitlerjugend.
From the German perspective: The German HQ and FO are dug in on the high ground at the bend in the road. First Company occupies the farm on the left and patrols from 2nd Company patrols are approaching the farm on the right. The Brits are spread out with the only units on the table being an infantry platoon supported by a carrier with a Vickers MMG approaching their first objective (the farm on the right). The British HQ is located behind the ruined house behind their start line. The farm BUA's (Built Up Areas) are designated by the building plus fenceline. Cristot is made up of 4 separate BUA's.

The Germans rolled three Ambush deployments but only placed two and their was no interdiction so they could arrive on the board easily. The British rolled three 1's which resulted in the loss of one platoon from the German 2nd Company and the loss of a Battalion Order.
The Brits win the first initiative. A patrol from B Company approaches the farm on the German right and an infantry platoon deploy on the Combat Patrol (CP) marker. They expect to be fired upon and the platoon has much better staying power than the patrol marker which will just vanish.
The deployed platoon from A Company make a dash for the objective (Rapid Move and they got a 5 &6 for an 11" move). The Vickers moved up in support whilst another platoon deployed on a CP in the center fields.
With the objective taken so rapidly, the German CP falls back into the orchard and an infantry platoon deploys. It opens fire on the Brits with no effect.
The platoon approaching the other farmhouse are met with a hail of fire from a hidden MG34. As they hit the ground (miraculously unharmed) an infantry platoon from 1st Company deploy and open fire from the nearby orchard as mortar rounds start to fall amongst them causing the platoon to become suppressed.
A second MG34 opens up from the upper story of a cafe in Cristot targeting the platoon in the objective/farm. Their fire has little effect. The other Brit platoon from A Company takes advantage and moves across the fields while the MG is otherwise occupied.
On the other flank another platoon from B Company deploys and fires on the orchard.
The Vickers carrier moves into position and shoots up the platoon in the orchard who's fire has managed to inflict Shock on the platoon in the objective. The Vickers supresses the Germans and combined with close range shooting from the platoon in the farm results in a KIA section for the Germans.
However, the German retaliation is quick and an artillery stonk hits the farm and the surrounding fields. The barrage has some effect by inflicting some Shock on the two platoons in the area.
A German platoon now reveals itself and pours fire into the British advancing through the fields.
No sooner do the German guns cease than British mortars take their place. But despite the accuracy of the British barrage (Critical Hit!) the effect on the enemy is negligible.
As the dust settles, the British take the time to rally their troops in an effort to force the center.
On the opposite flank rounds fly from both side with the center platoon of B Company just managing to hold on, out in the open.
The Vickers Carrier has been causing trouble so the commander of 1st Company sends out a panzerschreck crew to deal with it.
The panzerknackers work their way forward and take steady aim. The round hits home and the carrier explodes in a tremendous fireball. 
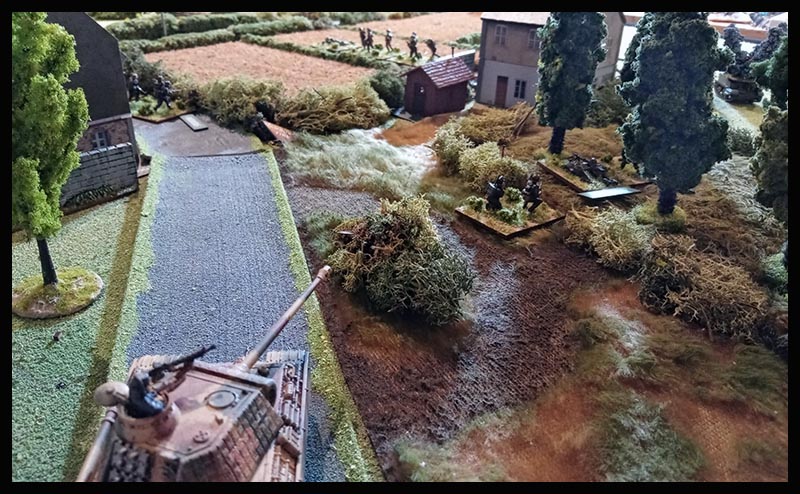
Up the road a rumbling can be heard and a Panther moves forward. It takes aim at the farm house and blasts it with HE but has little effect.
German mortars now target the objective causing some shock. The platoon in the field decide to attempt charging the Germans opposite but get bogged down in the tall wheat (they rolled badly for movement).
British Company B deployed their third platoon. They spotted a German patrol in a small woods opposite and fired up on them to drive them away.
The British armour now arrived. The lead Firefly immediately took aim the the distant Panther but it's shot missed completely. The Sherman section following fired HE on B Company's farm house
On the B Company front, British shooting proved effective and suppressed the platoon occupying the orchard. Using a Company Order, the same platoon charged into combat. The Germans attempted to retire but were caught flat footed. 
The British drove the Germans out and KIA one section in the process. The British themselves, took shock but not enough to suppress them.
Back in the fields outside Cristot, the other British attempt to assault was hit hard by MMG and rife fire. They lost one section KIA and decided to make their way back to cover.
At the same time, a 75mm Pak 40 revealed itself and took aim at the leading British tank. It's hit was uneffective but cause some Shock. (The was placed as an ambush unit prior to the first turn. Because I'm playing solo I just placed some markers that I made for Battlegroup with the Ambush Unit written on the bottom - There's no use trying to pretend to fool myself).
The MMG fire aimed at the center platoon of B Company became to much and they lost a section KIA.
After a duel with several shots being fired by both sides the Panther finally got the best of the Firefly section. (It was good to see that the whole affair was not decided by a single shot from the big German cat. Both the Panther and Pak 40 took shots and put 2 shock on the Firefly. The Firefly's shots were awful - Snake eyes for one of them -  and they didn't hit a thing.)
Opposite B Company the Germans pulled out of the farm and tried to take up a new defensive position. Unfortunately for them the company became Hesitant and the troops got caught out in the open
The Germans brought on their reserves: 3rd Company. The platoon of B Company closest to the road and now supported by a section of Sherman tanks, advanced to the road and fired on the platoon just coming into play. 
The British fire caused some Shock but they failed to notice a second Combat Patrol within the small wood where they had previously driven off a German patrol. On this Patrol Marker a German platoon now emerged and, at close range, poured rounds into the British flank. Using a React Move, the B Company platoon fell back to cover to lick their wounds.
However the German reserves fired on the supressed platoon and one section became KIA. This caused the first FUBAR of the game for the British command. To do this the German commander pulled everything out of his hat and reduced his Battalion Orders to zero.
The Brits now called in their artillery. The final German reserve platoon had deployed into Cristot so the area was rife with potential targets for the big guns. The German platoon on the road and the MG34 in the cafe were both suppressed, The 75mm pak 40 was destroyed and the German command now received their first FUBAR. (For the uninitiated: Fouled Up Beyond All Recognition - That's the clean version. In the game it represents the command starting to fray and could lead to eventual collapse as more FUBAR's are meted out.)
A newly deployed A Company platoon now moved forward to keep up the pressure on the orchard beside the first objective. Successful shooting suppressed the enemy taking cover in the trees. 
At the B Company farm the Germans who tried to form a new defensive line were caught and another infantry section were KIA. 
To keep the pressure on, the A Company commander issued a Company Order for the new platoon to assault the orchard. Supported by armour the men of A Coy assaulted. They destroyed one section and the remainder routed. The Germans now had a second FUBAR to deal with and the only troops protecting that flank was a panzerschreck section, 1st Company HQ and the Panther.
By this time the German command was in dire straights. What was left of the 1st Company became hesitant and a continuation of the British artillery bombardment inflicted further casualties on the beleaguered company.
On the opposite flank only a lone MMG section stood between two platoons and the German HQ and that MG section was suppressed.
The Germans were only 2 kills away from receiving their third FUBAR which would have seen the command collapse. In a final effort the Germans put out some desultory small arms fire and called in a final mortar stonk to cover their retreat. Cristot was now in British hands.

~~~~~~~~~~~~~~~~~~~~~~~~~~~~~~~~~~~~~~~~~~~

Conclusion: 

Well, that was my first game of 'O'Group and I hope to have many more against a real opponent. I really liked the larger scope of the game as opposed to the platoon level games I'm use to. Events in the rules are abstracted but I have to admit that I do like the way that a single "lucky" shot/hit isn't likely to change the course of the game with one dice roll. 

I didn't report all the little things that happened throughout the game. There was a lot of shooting, rallying, tanks firing HE and various other minor scuffles. I only included the more significant happenings. I didn't even report the British C Company entering the table because they had no effect on the final result.

A funny thing happens when I play solo. I try hard for the best for both sides. When the Firefly v Panther duel happened I found myself wanting to destroy the enemy from both sides. I just wanted a devastating destroyed result and I was barracking for whose-so-ever dice I was rolling at the time.

I like the more general movement as opposed to the sort of "precision movement" that usually occurs in skirmish level games. I much prefer general movement and a 'close enough is good enough' approach and I think these rules deliver that kind of ethos.

I read the rule book and I watched all the videos put up by the The Lardies so I had a general idea of how the rules worked but I found myself looking through the book often. But this was a leaning game for me and I expected that. There is a fair amount of detail throughout the rules and I wanted to try and get things right. There were a couple of things that I couldn't find or work out but I'm sure I'll get those things sorted when I try another solo effort some time soon.

Overall, I really like this game. It's on a larger scale than I'm use to for WWII but I want that. Platoon level seems wrong. It's either: One infantry platoon and whole load of other stuff all lumped in just for the purpose of using it because it's a WWII game. On the other hand there is: One infantry platoon and various other assets seemingly arbitrarily assigned to them. O Group seems to make a lot more sense: An infantry battalion with realistically assigned support assets.

One game I don't like at all is Flames of War. Every time I see that game it looks like a tank exercise with loads of tank models moving around in Napoleonic line formations with barely any infantry involved. To me it looks totally ridiculous.

So, I'm looking forward to more games of O Group. If possible, I want to make this my WWII game of choice and I'm thinking that later in the year I might start to gather the forces and make terrain for several Crete scenarios. 


Saturday, March 27, 2021

More Re-Basing: German Infantry Battalion

 I'm continuing with my WWII rebasing. I finished my British/Commonwealth infantry and I then moved onto some Germans. Initially, I was going to concentrate on my Hermann Goering/ Luftwaffe troops because I thought they would need less work to get them up to speed. In the the end I decided to do the regular infantry first but I needed to paint up a full company (that's an O-Group company or a platoon for other rules) to get them up to strength.

So this is the basic battalion for 'O' Group. I'm going to paint a bunch of individual riflemen so that they can also be used for Battlegroup and Chain of Command by adding an extra figure to the gun group. This rebasing makes them a whole lot easier to store and organize and will also make them much easier to move on the table.
Apart from the heavy weapons above, I also have several mortars already based which can be used for various rules. Like the British battalion command base, I once again added a 12mm dice holder for ease of play.
~~~~~~~~~~~~~~~~~~~~~~~~~~~~~~~~~~~~~~~~~~~~~~~~~~~

Last week I bought a pre-printed 20mm building from Battlefield Accessories - an Australian company based in Melbourne. This is a really nice little building that went together nice and easily. I added some carboard edges to the corners and roof apex to cover up the joins & make them look a bit tidier. I also glued a few strips cut from the mdf sprue to the bottom of the top half of the building. This enables the top to lock into the bottom layer. It took about 15 minutes from start to finish and it was ready for the table top. They do them in 15mm and 28mm too.
As you can see, the design for this one is pretty simple but it looks quite nice. It has a printed interior too, which is somewhat plain but it's far and above blank mdf or plain plastic. The interior windows match the outside windows which is useful for those games where those sort of things matter.
And here it is with some AB figures for scale. It will go well with the pre-painted PlastiCraft buildings I already have which are sort of 15mm/20mm... sort of somewhere in the vicinity. So the scale may be slightly different but not so much that it will really matter.
~~~~~~~~~~~~~~~~~~~~~~~~~~~~~~~~~~~~~~~~~~~~~~~~~~~
Hopefully, I'm going to try a solo game of 'O' Group in the very near future. So keep your eyes peeled for a full battle report (the first in a long while).

Sunday, March 14, 2021

'O' Group and a Big Re-Basing Project


Because I haven't posted on this blog for a while, I initially posted this article on my main blog at: This 28m Life and I'm cross posting it here to get this blog up and happening again.

+++++++++++++++++++++++++++++++++++

I've been looking forward for the release of the new WWII rules: 'O' Group. After playing a lot of Chain of Command in 2019, I sort of lost interest in it. Whilst I do like the game I think it's a bit small scale. For a platoon level game I actually prefer Battlegroup & one of the main reasons is: because I can get to use more of the models and figures I paint. CoC doesn't allow for this.

So I've been keen for the release of 'O' Group to get some games of larger actions happening where I can use plenty of the models I have. However, I need to rebase my figures because individual figures are not going to work for these rules. I'm quite happy with this even if it is a bit of a pain in the bum. I can still use the multi based figures for Battlegroup and maybe CoC if needs be. 
I started with my 1943 / '45 Brits because they are the most complete force that I own. With just a little bit a substituting one or two figures here and there I can field a complete battalion with heavy weapons, mortars, anti-tank, engineers etc. I also have enough models to field most of the armoured support and recce that I'll need to start with. Here is the completed battalion.
I have a bag full of these little mdf 12mm dice holders left over from another project a few years back. I added one to the BHQ base to hold a dice for the Battalion Orders. I like it and I'll do the same for all the other BHQ bases.
I'm now on to some Germans. I had forgotten what troops I had so I had to go through them. As it is, the Germans I have are far more fragmented. I thought I had a full infantry company but I don't. What I have is:
    2 x 1943 - '45 platoons with lots of odds & ends for support, 
    1 x early war platoon, 
    2.5 platoons of Hermann Goering Division organized as panzer-grenadiers, plus a section of assault pioneers (these will become a platoon),
    2+ platoons of Fallschirmjager in Mediterranean kit, and
    1 section of early war Fallschirmjager.
As I said... They're fragmented. So they're going to need a bit of work to bring them up to scratch. Each platoon will convert to 1 company so, for instance: I've decided to concentrate on the Hermann Goering's because they're the closest to a complete 3 company battalion and I can also sub them for regular troops if I need to. (The pic above are actually the regular infantry/grenadiers/schutzen).


P.S. A big Thank You to Viv at Knights of Dice for cutting the mdf bases for me. I decided on an odd base size (50mm x 30mm) and KoD came to the rescue for me.

Sunday, February 23, 2020

It's Been a While...

Yes it has been a while. Christmas happened then the New Year but I also got sidetracked by Napoleonic's before the New Year and Fantasy afterwards. See my other blog: This 28mm Life.

But last weekend was a return to Dubbya Dubbya  Eye Eye at the NWA in Croydon and the veterans of my newly minted Hermann Goering Div made their debut against a bunch of fresh faced G.I.'s. And they fought well for the defence of the Fatherland!

Alas and alackaday! For it was not I who commanded the HG Div. That duty was left to my opponent; Chee. I was on the receiving end of their 6 MG34's. And didn't I find out how nasty that platoon set up could be.

The game was set in a rural area with a road and a farmhouse as the only notable terrain pieces amongst some cultivated undulating ground. We rolled for a random scenario from the CoC rule book and got and Attack/Defend situation. As the U.S. I chose to attack. Looking at the above map I came in from from the right (or the bottom on the image below)
I don't have any images of the Patrol Phase and this is a shame because I patrolled aggressively and as a result I stymied my assault right from the get go. I went to pin down the German patrol phase early which also resulted in my own patrols being inadequately developed. I had a bit of a brain fade and forgot that when one side is pinned the phase ends... Duh! I had intended to push up on my right but I didn't get to do that.

Anyway, Chee ended up with his Jump Off Points in and around the farm house and my left, which was right where he wanted to be (again... My fault!) and I ended up restricted to the center and the road.

I chose a Pre-Game Barrage and an M5 Stuart for my supports Chee had a minefield and...

I rolled a 6 for my force moral giving me a total of 11 - The Germans were on 9.

The first GI's to arrive came in to the right of the burned out tank and made there way to the small copse of trees in the center where they came under fire from an MG34 in the house. They took a casualty and some shock but managed to run to the cover of the stone wall on the road, out of the arc of the MG.
Reinforcements were slow to arrive and only a Senior Leader (Sergeant) and the M5 arrived to give support. Luckily the bombardment kept the Germans from arriving too.

The Senior NCO ordered the squad to take the field beside the house (ie: jump the wall and take up positions in cover. Unfortunate die rolling saw the jump the wall and stall. Meanwhile a secont German platoon arrived and took up position behind some hedges to the rear of the farmhouse and opened fire on the GI's, causing minor casualties and some shock.

The M5 moved up and laid down some fire on the troops in the house casing some casualties and shock, but nothing significant. A second squad of infantry finally arrived in the center and moved off to the left.
The squad near the farmhouse moved into hard cover but they continued to take fire from the twin MG34's in the German section which was proving to be nasty with a total of 19 dice each time they opened up. Even the hard cover wasn't helping enough to keep them safe.

In the center, the final GI squad had arrived behind the low hill in the center. In an attempt to force the issue, the M5 moved up and shot up the farmhouse. The newly arrived squad crested the hill and shot up the farm house and the second squad rounded a thick hedge and shot up the farmhouse. This resulted in some casualties, some shock and a dead junior leader. But it wasn't enough. 
The squad beside the farm were forced to retire (rout) and both MG34's in the farmhouse opened up on the squad cresting the hill and hurt them badly (I think I rolled five 6's for 5 dead and some shock! - Ouch!). That was stupid of me. I was hoping to overwhelm them with shooting and at least pin them but I didn't have enough firepower, even though I did score a decent amount of hits.

My Force Moral was really starting to suffer.

The third German platoon arrived. They were on my left flank and in foxholes. They shot me a bit but I used a CoC Dice to Interrupt and withdrew the shot-up squad on the hill to safety. Then Chee pulled out a CoC Dice and used it for an Ambush! A panzerschreck team popped up and popped my little Stuart tank.
At this stage I said to my opponent that I'd lost and there was little I could do to win. But we played another turn and I decided to assault the entrenched Germans on my left. The Platoon Commander, who had arrived a few turns earlier, ordered the assault. It went how I expected. My section was wiped out but they did take half the German section with them. It wasn't a realistic thing to do,under the circumstances, but it was worth it just to play through the rules mechanism (I think we've only had one assault previously).

The US Force Moral was down to 3. The Germans down to 6 (maybe 5). The American's were exhausted with nothing left to contribute to the fight.
~~~~~~~~~~~~~~~~~~~~~~~~~~~~~~~~~~~~~~~~~

Conclusion...

I was pretty rusty on this game. I forgot some of the very basics and, as a result, I buggered it from the start. I was overly aggressive in the patrol phase and should have taken the time to maneuver instead of trying to bulldoze.

Another thing I should have done was to use the M5 to lay down suppressive fire instead of trying to cause casualties. It's not powerful enough for that role but it could have helped to reduce the German's ability to hit me. 

Chee's game was very defensive. He didn't have to maneuver his troops once they were placed. A very static and effective defence.