As the title suggests, I played another solo game of O Group to get familiar with the rules (also just for the sake of playing the game because I really liked it last time). I posted the blog of my previous game on my club's Fascistbook site and found that several members are interested in the game. Hopefully we can get some games in, sometime soon.
The Germans hold the top of the table to the line of the road. the British start line is approx 12" onto the table.
~~~~~~~~~~~~~~~~~~~~~~~~~~~~~~~~~~~~~~~~~~~~~~~~~~~
For this game I made up a simple scenario set in the Normandy hedge rows: The Attack at Maison Jaune. The table is pretty cluttered and suited to the defender. The Germans have a depleted company (8 platoons) with a Panzer IVH platoon, a StuG assault gun section and a quad 20mm AA section. The Brits have a full company with an armoured reconnaissance platoon, two tank platoons (Cromwells & Fireflies), heavy weapons. The Brits have two artillery missions and the Germans have one (both sides rolled a dice pre-game to see if they received an extra arty mission on a 5 or 6. Both failed).
Zer Britisher Mission: The 2nd Battalion, 4th Inns & Outs, will capture the high ground behind the Maison Jaune for the benefit of impending operations.
The plan is to hold Gerry at the Maison Jaune on their right flank with A Company, whilst B Company delivers a left hook at le Ferme de Odeur. In front of the farm is a deforested area with a burnt out Churchill tank, aptly titled Churchill Field. It is rough ground and provides cover for infantry. Armour can enter via any of the three dirt roads/lanes.
Gerry's Plan: Hold the road. The 1st Company is located at the Ferme de Odeur and surrounds. 2nd Company holds the Maison Jaune area. Armour can enter via the roads and tracks under German control. The 20mm quad flak is dug in and camouflaged on the high ground.
~~~~~~~~~~~~~~~~~~~~~~~~~~~~~~~~~~~~~~~~~~~~~~~~~~~
The Germans lost one platoon from 1st Company, 1 Battalion Order and 3 turns of Interdiction due to the British preliminary bombardment. The Germans now have two depleted companies are now down to 7 platoons, A good start for the British.
The only unit to start on the table is a platoon from A Company supported by a Vickers MMG. Their job is to suppress the house while the rest of the platoon hold the road and keep Gerry pinned.
The second platoon of A Coy deploy into a wheat field while all along the line British patrols cautiously make their way forward.
The Germans make their presence felt with sustained fire from a platoon and MG42 lodged in the Maison Jeune and inflicting some Shock onto the British platoon.
At le Ferme de Odeur Germans are spotted in the pig sty. Small arms fire from the farm house on the platoon in the field has no effect.
A second lot of Gerry's are seen taking up positions in the adjacent orchard. They open fire and drive off a patrol to their front (
Combat Patrol Markers are removed if they receive 1 un-saved Shock).
The A Coy platoon advance through the field under fire but they are then hit by mortar stonk that completely Suppresses them (units are Suppressed when they received 3 points of Shock).
On the far left the British armoured recce deploy and attempt a
Reconnoiter Action to remove the German patrol visible in the top left corner of the pic below. They were successful and the
Combat Patrol was removed.
The British retained the initiative and as the dust cleared they attempted to
Rally the mortared & unlucky, Third platoon. The platoon completely failed the rally roll and, instead fell back through the wheat field.
Third Platoon falling back left the flank of the Second open so they couldn't attempt to storm the small wood opposite their position.
In front of the Maison, the firefight continued with neither side gaining an advantage.
No sooner had the third platoon settled down when Fritz's mortars hit them again. This time the stonk was less accurate and came out unscathed. Elsewhere German activity was somewhat cautious.
In front of the Maison the platoon made a full
Rally recovery. They were then issued a
Company Order to try and suppress the German's in the solid yellow building with sustained fire from the Vickers MMG. The ploy worked and the return fire became very desultory (
the German platoon took 3 Shock, so they became suppressed).
Preparing for the attack men from B Company begin to deploy in Churchill Field in front of the farm and begin firing on the orchard. An artillery barrage that was supposed lay smoke failed to eventuate leaving the infantry unsupported and exposed (
the dice roll failed so the smoke didn't arrive).

German infantry enter the wood next to the Maison Jaune. The unwillingness of the Brits to storm the wood with an open flank has enabled the Gerry commander to push forward his troops.
A mortar stonk that was to target the A Coy platoon in front of the wood reported
Low Ammunition and would need a resupply. (
When rolling for mortars, a roll of 4 or less means a Low on Ammo result. They can re-sup next turn but it means two full turns without mortar support).
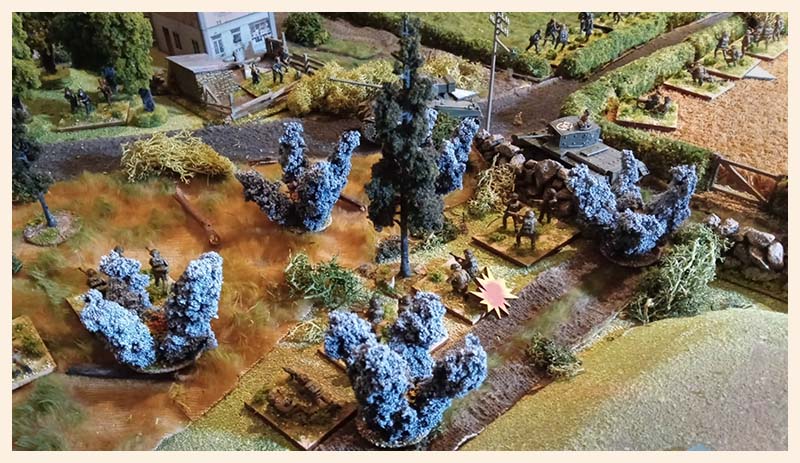
Opposite the Churchill Field a platoon of Pz IV-H's rumble forward catching the preoccupied recce platoon unawares. The lead panzers open up and...
Direct hits strike the armoured car section and destroy it. (A
roll of 11 = Critical Hit the difference in armour was -8 to the recce. They rolled 6 so ended up with a negative 2 result.)
The remaining section of Dingo Scout Cars pulled back as rapidly as they could using a
React Move. (
A React Action is an action taken in the opponents phase. You can either do a Shooting or Move Reaction. The Dingo chose to Move having made the decision that it's bren gun was no match for the panzer's armour).
From the wood a hail of fire erupted. Second platoon, opposite received some shock as a result. The Brits fired back with no effect.
With the arrival of the panzers the Germans gained the initiative (
they won the initiative roll for the first time). The tanks rolled forward and the combination of HE and fire from the platoon in the orchard the Tommies in Churchill Field took casualties and lost a section.
Better late than never, British artillery hits the farm and orchard. However, the barrage is inaccurate and does no damage whist causing very little shock on the defenders.
But it's time for the cavalry to come to the rescue. An armoured platoon lead by a Firefly makes it's way up the road. It's 17pdr pointed right at the leading Pz IV. The first shot of the big tank killer flies off into the wild blue yonder never to be heard of again. That's quality English marksmanship for you!
* Being Welsh, take note how I blame the English.*A duel begins between the Firefly and the full Pz IV platoon. One panzer is
Damaged and the Firefly takes one point of
Shock. Meanwhile the barrage on the farm continues and is now zeroed in. The garrison takes shock and the platoon in the wood is suppressed. The German FOO is in the farmhouse and narrowly missed becoming a casualty.
The arrival of the tanks gives courage to the hapless 3 platoon A Coy. They advance to the road and begin a close quarters firefight with the Fritz's on the opposite side and seem to be getting the worst of it.
But at le Ferme de Odeur, accurate fire from B company along with the barrage sees the garrison suppressed.
Keeping their heads down and unaware of it's presence, the troops in the farm take some sustained fire from a Vickers MG. This results in a
KIA and the loss of an infantry section.
The second tank platoon arrives firing HE at the farm and the Maison to absolutely no effect at all. At the Maison Jaune the firefight continues with neither side gaining an advantage. The plan to hold this area seems to be working.
The British armoured spearhead arrives.
Using a Company Order, the Firefly moves out of the confining laneway taking the fight to the panzers. It hits the lead tank section causing more shock on the already unsteady crews. The Cromwell also fires but its shot is ineffective. Both panzers return fire and totally miss their targets.
After the barrage lifts the stunned and shocked Germans take accurate fire from the men of B Company & begin to take casualties (one KIA section for the platoon in the orchard).
The armoured duel continues with both sides unable to land a decisive hit on the other. In the central road area the hapless 3 platoon, A Coy lose a section in the firefight.
Just as the Inns & Outs begin to gain the ascendancy over their enemies Fritz pulls out his trump card and an accurate barrage of 105mm guns lands right in the middle of their attack. The attackers are thrown back in stunned confusion. (
Both platoons supressed. They could have stayed inside the barrage but risked more Shock and possible KIA losses).
In the center, 3 platoon, A Coy lose a section in the close quarters firefight. As the firefight continues 3 platoon lose another section and the remainder of the unit routs leaving a large gap in the defensive line and gives the British command their first
FUBAR.
From behind the farm a StuG III assault gun appears. It takes aim at the Comet section in the lane and misses it's target. Meanwhile, the Pz IV's continue the fight with the Firefly but they are unable to make any headway. The British armour returns fire and this time the Firefly gets a
Critical Hit on the undamaged Pz IV section. The German armour fails and the section is totally demolished by the mighty 17pdr! (
And I forgot to take a pic after all this endless bad shooting).
From the pig sty, an infantryman with a panzerfaust crawls forward and takes aim at the flank of the Firefly. The shot is good and the Firefly is now marked as
Damaged. (
The model itself represents a section so Damaged sort of means that one of the tanks in the section is knocked out.)
Moving into position a Gerry anti-tank section armed with a panzerschreck looks down the lane at a prime target but they need a
Company Order to get a shot off. The shot hits but only rattles the crew's brains a bit (just
1 point of Shock). Returning fire has no effect so the tank commander decides to take drastic action.
Ordering his driver to go full pelt, the fast Cromwell tries to ram the anti-tank section and over run them. The Germans don't panic and hold their ground resulting in the Cromwell becoming bogged down and lodged in the tall hedge with the crew now supressed.
Trying to get the attack back underway le Ferme de Oduer is hit with another mortar stonk inflicting a KIA on the defenders. The remaining section stoically passed their moral test and remained within the farmhouse.
A long firefight kept going around the Maison with neither side able to gain any advantage. The German platoon in the wood decided to assault the Tommies opposite. Their initial shooting caused serious damage suppressing the Brits and killing a section. The British returned fire with no effect. The Germans assaulted the hedges...
The Inns & Outs lost one section and the remaining section routed. The Krauts received no
Shock and even managed to
Rally the 1 point of
Shock with which they started the assault. Both 3 and 2 platoons of A Coy were now hors de combat. The entire center of the British line was now open and the command received a second FUBAR.
Another brave grenadier with a panzerfaust crept forward to try and take out a Cromwell but his aim was poor and the shot ineffective.
Before the attack on the farm could be renewed mortars hit the infantry and another two sections were KIA. Almost FUBAR #3.
A perfect target and the Englishers just couldn't hit the side of a barn. The Firefly fired HE at the enemy platoon to no effect at all. Nothing was working now for the Brits. Everything was going south.
There was nothing left to do. The British commander couldn't bring on C Company due to the loss of command dice due to the FUBARS. With B Coy going
Hesitant the British commander now had no choice other than calling off the attack.
With the tanks either trapped in the close laneways or damaged and at the mercy of Gerry's infantry anti-tank weapons and with no infantry support, the armoured thrust came to a halt and and would have to back up out of trouble.
Churchill Field now had a few more wrecks to keep the big burnt out hulk company.
In the orchard where British BHQ is set up:
"Captain Frontbottom?"
"Yes Sir."
"Get on the blower and tell the men to pull out. Those in the rear have let us down again. Where was my smoke? If we'd had smoke the 4th Inns & Outs would have been heroes today. We could have been in the blasted newspapers!"
With Each FUBAR the command dice are reduced by one. This might not seem a big deal but it is. It begins to make command more difficult and there is also the chance of a Command Crisis where the commander can also lose Battalion Orders. The Brits were Down to one Battalion Order by the end. On the other hand in the last turn the Germans rolled their maximum 9 orders and then got +1 for winning the initiative. Add to this a full 6 Battalion Orders. That's 16 orders. The Brits got 4 and a Hesitant company. So it ended. There was absolutely no way the attack could succeed.~~~~~~~~~~~~~~~~~~~~~~~~~~~~~~~~~~~~~~~~~~~~~~~~~~~
Conclusion:
Once again it was a great game and I'm getting a better handle on the rules. First time I forgot a few rules and this time I remembered them. I also purposely tried a couple of different things like Reconnaissance and making much more use of React Actions. I included a 20mm Quad flak but it never got on the table. I was hoping some Jabo's would make an appearance but it didn't happen. Alas...
I made the terrain very closed in to see how armour worked in close terrain. Not very effectively as it turned out. Unfortunately I only have a 6x4 table so I can't really set out a larger game with open flanks ready for sweeping manoeuvrers. But I'm just testing the game and teaching myself and when I get to my club we'll be able to have more impressive set ups.
Now here's something to think about... This is the second time I played this scenario. On the first one the Intediction from the pre-game barrage stopped every German unit from deploying and the Brits just walked in a took the objectives. By turn 3 it was over. This made for a very boring game so I started over. I used the same deployment and the same pre-game barrage rolls. This second game turned out very different.
Making up the forces I can see that there are some major gaps but, the lists in the main book are pretty much late war for the Big European Four. I hope there are inclusions, changes, variation & clarity to army lists in any upcoming scenario books.
All in all, I now have a better grasp on the basics and some of the details. I found I didn't need to refer to the player sheets or the book as often. I'll definitely have another solo game soon but I might try a different theatre...


 The second platoon of A Coy deploy into a wheat field while all along the line British patrols cautiously make their way forward.


 From the wood a hail of fire erupted. Second platoon, opposite received some shock as a result. The Brits fired back with no effect.
 With the arrival of the panzers the Germans gained the initiative (they won the initiative roll for the first time). The tanks rolled forward and the combination of HE and fire from the platoon in the orchard the Tommies in Churchill Field took casualties and lost a section.
  Better late than never, British artillery hits the farm and orchard. However, the barrage is inaccurate and does no damage whist causing very little shock on the defenders.
 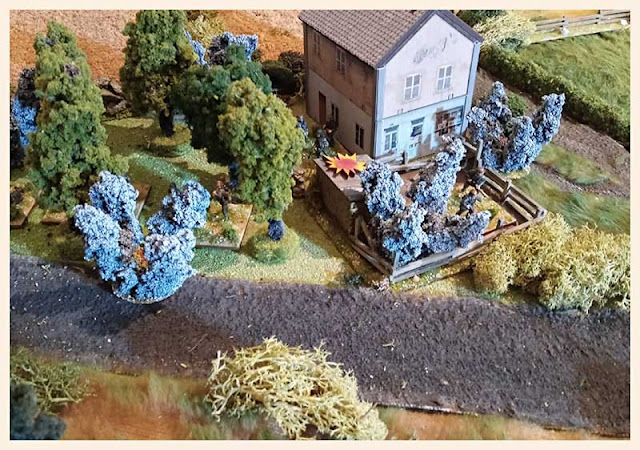 But it's time for the cavalry to come to the rescue. An armoured platoon lead by a Firefly makes it's way up the road. It's 17pdr pointed right at the leading Pz IV. The first shot of the big tank killer flies off into the wild blue yonder never to be heard of again. That's quality English marksmanship for you!


 A duel begins between the Firefly and the full Pz IV platoon. One panzer is Damaged and the Firefly takes one point of Shock. Meanwhile the barrage on the farm continues and is now zeroed in. The garrison takes shock and the platoon in the wood is suppressed. The German FOO is in the farmhouse and narrowly missed becoming a casualty.
 The arrival of the tanks gives courage to the hapless 3 platoon A Coy. They advance to the road and begin a close quarters firefight with the Fritz's on the opposite side and seem to be getting the worst of it.


Excellent report, table and miniatures. Noticed you are doing it in 20mm that is my scale too. Just two questions. What is the size of your table and who makes the telephone poles?
ReplyDeleteHi Greg, thanks for your comment. My table is just a 6 x 4 which is a little bit small in my opinion. I don't know who makes the telephone poles. I got them at a model railway shop along with other pieces.
Delete